Monitoring the network activity of your device is one of the best ways to debug network related bugs. A lot of times hours of frustrating debugging can be solved by simply looking at the actual packets your device is sending to the internet. Also, and you didn’t hear it from me, it is a very useful method to see what other apps are doing.
This tutorial assumes familiarity with network analysis tool such as Paros and Wireshark. I will not show how to use those tools, or the scenarios where you need to use them, but I will show two very simple ways to use those tool to monitor network activity on your iPhone.
Those methods will work only for wi-fi connections. Monitoring the network activity on 3G is much much more complicated and I will not deal with it today.
Using an http proxy
The simplest way to monitor your activity is to set a HTTP proxy. My favorite HTTP proxy is Paros, but there are a lot of different ones out there.
To use Paros to monitor you network activity follow those steps:
- Download and install Paros, and run it
- Find out your computer’s IP address from System Preferences -> Network.
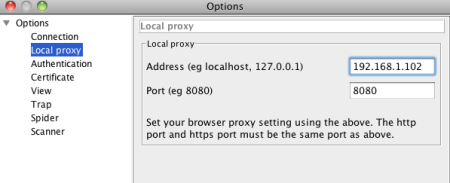
- Configure Paros – set the local proxy address to [Your IP address]
- On your iPhone, visit Settings -> Wi-Fi -> arrow button of you selected wifi
- Set HttpProxy to Manual and enter:
- That’s it. Now when you’ll work with the iPhone, you will see the Paros window filling with your HTTP requests
You can of course use the same method to monitor your iPhone simulator. This is even simpler, just set Paros’ “Local proxy address” to “localhost”.
Advanced network monitoring using Wireshark
Http proxy is a great method and it will be enough around 90% of the times. There are times however, when you need a deeper investigation – analyzing the entire TCP connection, analyzing non HTTP protocols, etc. The best tool for network analysis is Wireshark. Using Wireshark to monitor your iPhone’s activity is a little more complicated since the iPhone only allows setting an HTTP proxy. To overcome this we will use a nice little trick – your Mac has the ability to become a wi-fi hub with just a few clicks. This little known feature is the key to monitoring the iPhone’s activity. All we need to do set the iPhone to use the wi-fi generated by our Mac, and all of its network activity will pass through the Mac, allowing us to sniff it using WireShark!
To monitor network activity using Wireshark, follow those steps:
- Download, install and run Wireshark
- Connect you Mac to the internet via Ethernet. This is unfortunately mandatory, since you can’t turn the computer to a wi-fi hub if you are connected to the internet via wi-fi
- Enter System Preferences -> Sharing -> Internet sharing.
- Set “Share your connection from:” to Ethernet and set “To computers using:” to AirPort, and check the “Internet Sharing” checkbox. This will create a new wi-fi network with your computer’s name. Make sure to set a password for this wi-fi network.
- On your iPhone, enter Settings -> Wi-Fi and choose the new wi-fi network
- That’s it. Now all your iPhone’s network activity is routed through your Mac computer, and you can sniff it with Wireshark
I hope you’ll find this article useful, and that network monitoring will become one of the main tools in your arsenal.


Nice post 😉
What if I don’t have a Mac?
I need to Monitoring the network activity on 3G. Can you please help? let me know of any way/article to do it..
There are two methods that I can think of, but I didn’t actually tried any of them. The first one, if you have a jailbroken phone, is to install a packet sniffer on the device. There is a tutorial on a specific one here – http://www.ijailbreak.com/applications/learn-how-to-sniff-wireless-passwords-with-pirni/.
The second option is to use your own VPN network as described in this tutorial – http://stevebranding.wordpress.com/2012/04/26/sniffing-3g-data/
Good luck and I’d love to hear if any of these methods worked for you.
Thank you. First article that verbally explains to me why my wireshark can not see all of my iPhone activities.